Aug 8, 2024 • 6 min read
How to Use OpenTelemetry to Monitor Next.js Applications

Observability is key to monitoring and improving your web application's performance. Integrating OpenTelemetry with your Next.js app provides valuable insights into its behavior. This blog post guides you through configuring Next.js to push data to your Collector using OpenTelemetry.
We'll cover two integration methods: Vercel's @vercel/otel package and manual setup. Both have their benefits and considerations. By the end, you'll understand how to set up OpenTelemetry in your Next.js app, use default and custom spans, and see how Highlight can enhance your observability. Let's get started!
Next.js Integration
Assuming you have your OpenTelemetry collector configured (check out my previous post if you need help with this), we work on configuring Next.js to push data to our Collector. Luckily, Next has a great article about this process. There are basically 2 ways of integrating OpenTelemetry with Next, a package made by vercel and doing so manually.
Before Next.js 15, the instrumentation is experimental, so you will have to enable it explicitly:
/** @type {import('next').NextConfig} */
module.exports = {
  experimental: {
    instrumentationHook: true,
  },
};


Once done, you will need to create a file called instrumentation.ts at the root of your app (NOT in the app or pages folders). In that file, you will export a function called register. This function runs ONCE when a new Next.js server instance is initiated. So, it can be helpful for doing things like registering and setting up globals.
Default Spans
There are quite a few default spans that Next.js ships with once you have the experimental flag turned on. All of these spans are available whether you are using Vercel's @vercel/otel package or doing a manual integration. There are however some spans that only apply to the app router while there are some others that only apply to the pages router.
On many of the spans, there will be a set of attributes you can search and filter your telemetry data based on:
next.span_name- duplicates span namenext.span_type- each span type has a unique identifiernext.route- The route pattern of the request (e.g., /[param]/user).next.rsc(true/false) - Whether the request is an RSC request, such as prefetch.next.page- This is an internal value used by an app router.- You can think about it as a route to a special file (like page.ts, layout.ts, loading.ts and others)
- It can be used as a unique identifier only when paired with next.route because /layout can be used to identify both /(groupA)/layout.ts and /(groupB)/layout.ts
The comman spans you can find are:
[http.method] [next.route]- fetch
[http.method] [http.url] - generateMetadata
[next.page] - resolve page components
- resolve segment modules
- start response
App router specific spans:
- render route (app)
[next.route] - executing api route (app)
[next.route]
Pages router specific spans:
- getServerSideProps
[next.route] - getStaticProps
[next.route] - render route (pages)
[next.route]
Custom Spans
If you want to add custom spans to your application, the process is fairly simple. You just need to bring in the OpenTelemetry SDK, get the tracer, and then start a span. Make sure to end the span when appropriate. Another thing to be aware of is that spans have some semantic conventions to follow to make sure your spans play nicely with others.
Example code:
import { trace } from "@opentelemetry/api";

export async function fetchGithubStars() {
  return await trace
    .getTracer("next-app")
    .startActiveSpan("fetchGithubStars", async (span) => {
      try {
        return await getValue();
      } finally {
        span.end();
      }
    });
}
Option A: Wiring Up @vercel/otel
The @vercel/otel package is very easy to get started with. It works everywhere that Next.js works. So, it will run in in Vercel's Node.js environment, it will run at the edge, and it will run in your own self-hosted environments too.
After installation, there is really just one major thing you need to do. YOu will import the package and run the registerOTel function with a string for your service name.
import { registerOTel } from "@vercel/otel";

export function register() {
  registerOTel("next-app");
}
You can also pass a config object that allows you to customize things a bit more. The configuration interface currently looks like this:
interface Configuration {
  attributes?: Attributes;
  attributesFromHeaders?: AttributesFromHeaders;
  autoDetectResources?: boolean;
  contextManager?: ContextManager;
  idGenerator?: IdGenerator;
  instrumentationConfig?: InstrumentationConfiguration;
  instrumentations?: InstrumentationOptionOrName[];
  logRecordProcessor?: LogRecordProcessor;
  metricReader?: MetricReader;
  propagators?: PropagatorOrName[];
  resourceDetectors?: DetectorSync[];
  serviceName?: string;
  spanLimits?: SpanLimits;
  spanProcessors?: SpanProcessorOrName[];
  traceExporter?: SpanExporterOrName;
  traceSampler?: SampleOrName;
  views?: View[];
}
We won't dig too deeply into customizing that config here, but there is a lot of power in there.
Option B: Manual Integration
Instead of using the @vercel/otel package, you can do a manual integration. One important note is that the manual integration is NOT compatible with the Edge runtime.
Because of that we need to make sure we only register our instrumentation function in a Node.js based environment:
export async function register() {
  if (process.env.NEXT_RUNTIME === "nodejs") {
    await import("./instrumentation.node.ts");
  }
}
In the instrumentation.node.ts file we can then import the OpenTelemetry Node SDK along with some other classes and start the SDK:
import { NodeSDK } from "@opentelemetry/sdk-node";
import { OTLPTraceExporter } from "@opentelemetry/exporter-trace-otlp-http";
import { Resource } from "@opentelemetry/resources";
import { SEMRESATTRS_SERVICE_NAME } from "@opentelemetry/semantic-conventions";
import { SimpleSpanProcessor } from "@opentelemetry/sdk-trace-node";

const sdk = new NodeSDK({
  resource: new Resource({
    [SEMRESATTRS_SERVICE_NAME]: "next-app",
  }),
  spanProcessor: new SimpleSpanProcessor(new OTLPTraceExporter()),
});
sdk.start();
That's it. Pretty straightforward. There is a lot more you can do with it, though, such as instrumenting other parts of your node application:
const instrumentations = getNodeAutoInstrumentations({
  "@opentelemetry/instrumentation-pino": {
    logHook: (span, record, level) => {
      record["resource.service.name"] = "next-app";
      span.setAttribute("NEXT_LOG_KEY", "NEXT_LOG_VALUE");

      const attrs = span.attributes;
      for (const [key, value] of Object.entries(attrs)) {
        record[key] = value;
      }
    },
    // Log span context under custom keys
    // This is optional, and will default to "trace_id", "span_id" and "trace_flags" as the keys
    logKeys: {
      traceId: "traceId",
      spanId: "spanId",
      traceFlags: "traceFlags",
    },
  },
  // load custom configuration for http instrumentation
  "@opentelemetry/instrumentation-http": {
    applyCustomAttributesOnSpan: (span) => {
      span.setAttribute("foo2", "bar2");
    },
  },
  "@opentelemetry/instrumentation-fs": { enabled: false },
});

registerInstrumentations({
  instrumentations,
});

const sdk = new NodeSDK({
  resource: new Resource({
    [SEMRESATTRS_SERVICE_NAME]: "next-app",
  }),
  instrumentations,
});

sdk.start();
Manual Configuration: Edge Support
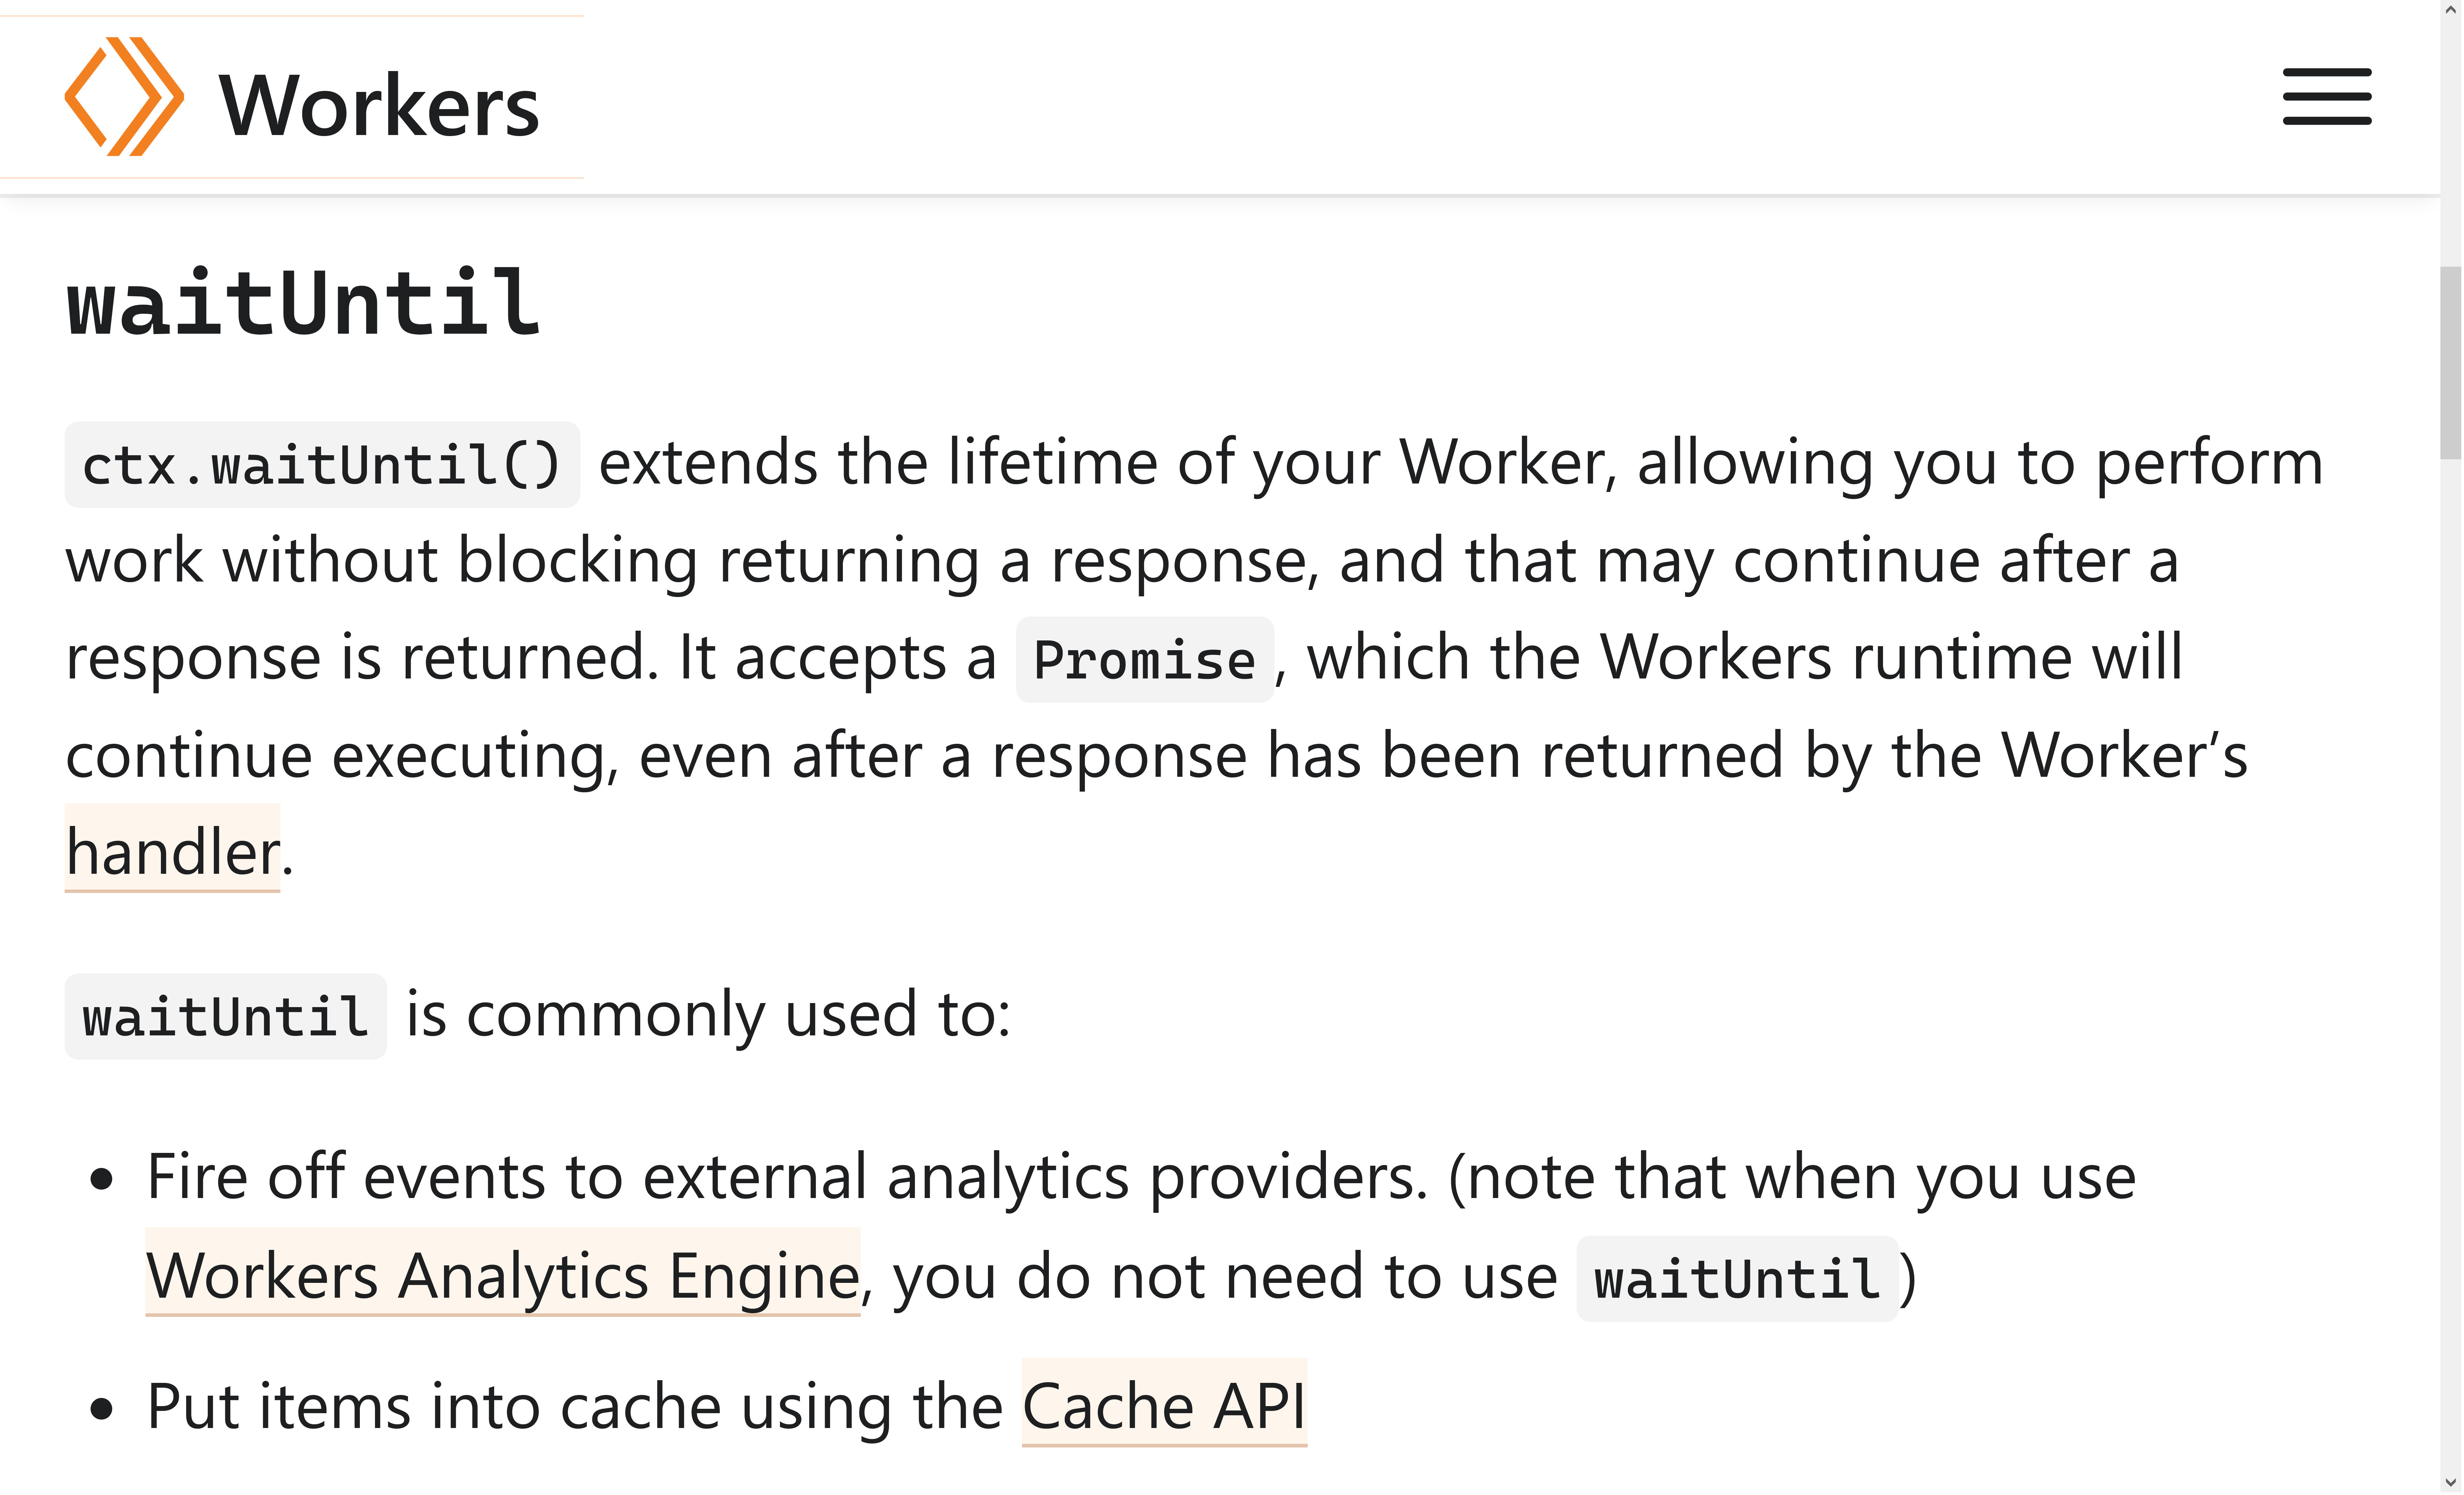
While this is not official, it does seem like there is a way to get a manual configuration to play nicely with the Edge runtime. Since Vercel is using CloudFlare workers, according to this HackerNews comment by Lee Robinson, we can use their waitUntil API.
At Highlight, the waitUntil API is polyfilled to support the edge runtime, so you don't have to do anything extra.
How Does Highlight Help?
At this point, if you have a collector set up and your Next.js instrumentation hook set up you are pretty much good to go. So, you might be wondering what Highlight can do for you.
Well, for one, Highlight has their own collector that you will connect to. That takes away the ehadache of making sure it can scale. Having someone on your team deal with and worry about that means that time could be better spent building your application and shipping features to delight your users.
More Than Just the OpenTelemetry Node.js SDK
Beyond handling that scalability for you, Highlight also helps you do things that the official OpenTelemetry Node.js just doesn't support, yet.
As mentioned earlier, the official Node.js SDK's support for logging is under development. Highlight fills that gap so that you can get Logging and Error Tracing like you would expect from any other major provider.
The big thing that sets Highlight apart is top notch Session Replay. Highlight puts in a lot of effort to tie client-side events and spans to your server-side traces. This gives you the ability to see the path your users are taking through your application. Don't worry every effort is made to scrub any personal data from the replay, which is another thing Highlight's Collector adds for you without any extra effort on your part.
Wrapping Up
I hope you enjoyed reading this and I hope there was something fun to learn. At the end of the day:
- whether you use Vercel or self-host...
- whether you use Highlight or your own collector and providers or maybe even another OpenTelemetry compliant vendor...
OTEL is an incredibly important project that can help you maintain a vendor-agnostic telemetry integration. You can reduce the amount of rewriting and churn when you decide to change providers. Thanks for reading.
Other articles you may like
Oct 25, 2022 • 7 min. read